A step-by-step guide to using your iCIMS Connector to invite people to take assessments, review their Berke scores after completion, and check in on their assessment status.
Please note: This tutorial requires the Connector to iCIMS already be enabled. Please contact the Customer Success team if you have not completed this step.
Invite candidates to take assessments
- Login to iCIMS.
- Find and select the candidate you want to invite to take an assessment and verify that they have a valid email address. Berke invitations require a working email address.
- Select your “Workflows” tab, then click the down arrow below the “Recruit” box.
- Choose the “Take Action” icon from the options shown. It resembles a movie director’s clapboard.
- An “Edit Profiles” box will open. Select “Assessments: Initiate Berke” from the “Status” dropdown list, then click “Save.” This tells Berke to send an email invitation to the candidate.
Note: The box will change to say “Follow the link to confirm the action” after the invitation is sent. There is not a link to confirm, so don’t be confused by this message.
Correcting email addresses
If the candidate’s email address is incorrect, update the candidate’s email address and save the change, then return to the “Workflows” tab and perform the “Take Action” steps above again. This will send the invitation to the new email address.
Checking assessment status
- Login to iCIMS.
- Find and select the candidate you want to see the status of.
- Select your “Workflows” tab, then click the down arrow below the “Recruit” box.
- Choose the icon that resembles two chain links.
- A “Screen” box will open. Click the right-arrow in the “Assessments” box to show one of the following assessment statuses:
- “Sent” indicates the candidate has received an invitation via email.
- “In Progress” indicates the candidate has started the assessment, but has not reached the end.
- “Complete” indicates the candidate has finished all sections of the assessment. Note: If “Complete,” the results will be present as well. Keep reading on for a description of the results data.
Reviewing completed assessments
- Login to iCIMS.
- Find and select the candidate you want to see the status of.
- Select your “Workflows” tab, then click the down arrow below the “Recruit” box.
- Choose the icon that resembles two chain links.
- A “Screen” box will open. Click the right-arrow in the “Assessments” box to show one of the following assessment statuses:
- “Berke Score Level” will be High, Medium, or Low. High is between 67 and 100, Medium is between 34 and 66, and Low is between 1 and 33. Note: If the Berke Assessment is complete and this line is blank, then the Berke Assessment is not configured to return a score level.
- “Berke Score” will be between 1 and 100. Note: If the Berke Assessment is complete and this line is blank, then the Berke Assessment is not configured to return a score.
- “Assessment Date” is the date and time the candidate completed the assessment.
- “Berke Report” is a link to view the Berke Report and Interview Guide. Note: This link does not require a iCIMS or Berke login. To share the report either download the PDF and email it as an attached or copy and paste the link into an email. Anyone who receives the link can access the report (but no other reports – the link is unique).
Assign assessments to jobs
Before you can invite anyone to take an assessment via iCIMS, you must first assign your jobs to the corresponding assessment you’d like each participant to complete. This is the only portion that will be completed inside your Berke account and must be completed by the account administrator within your company.
- Login to your iCIMS account.
- Create a job you’d like to assign to a Berke assessment (you can also use an existing job and skip to the next step).
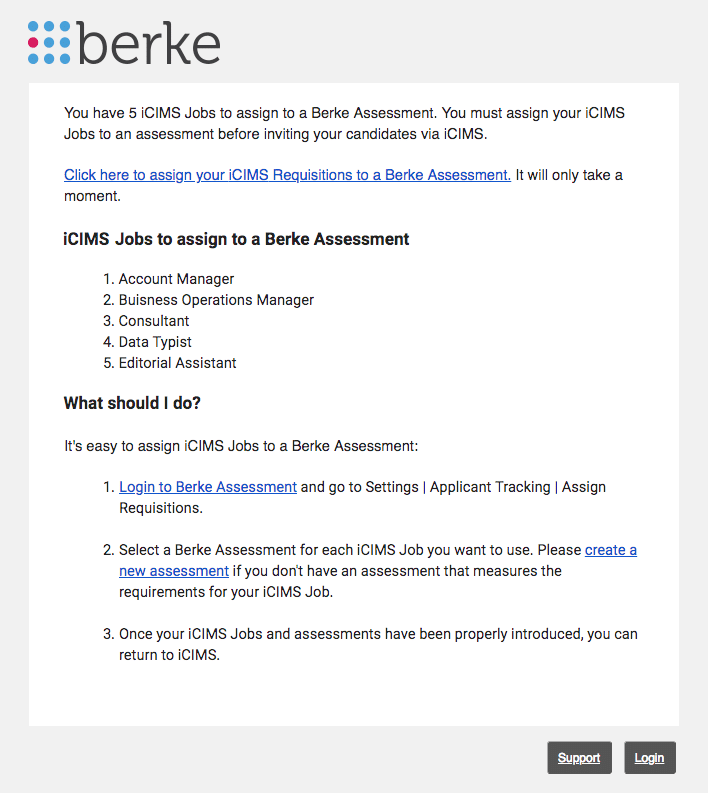
- An email will be sent to the integration owner informing them of the job and prompting them to assign it to a Berke assessment. Click the email prompt or login to your Berke account.

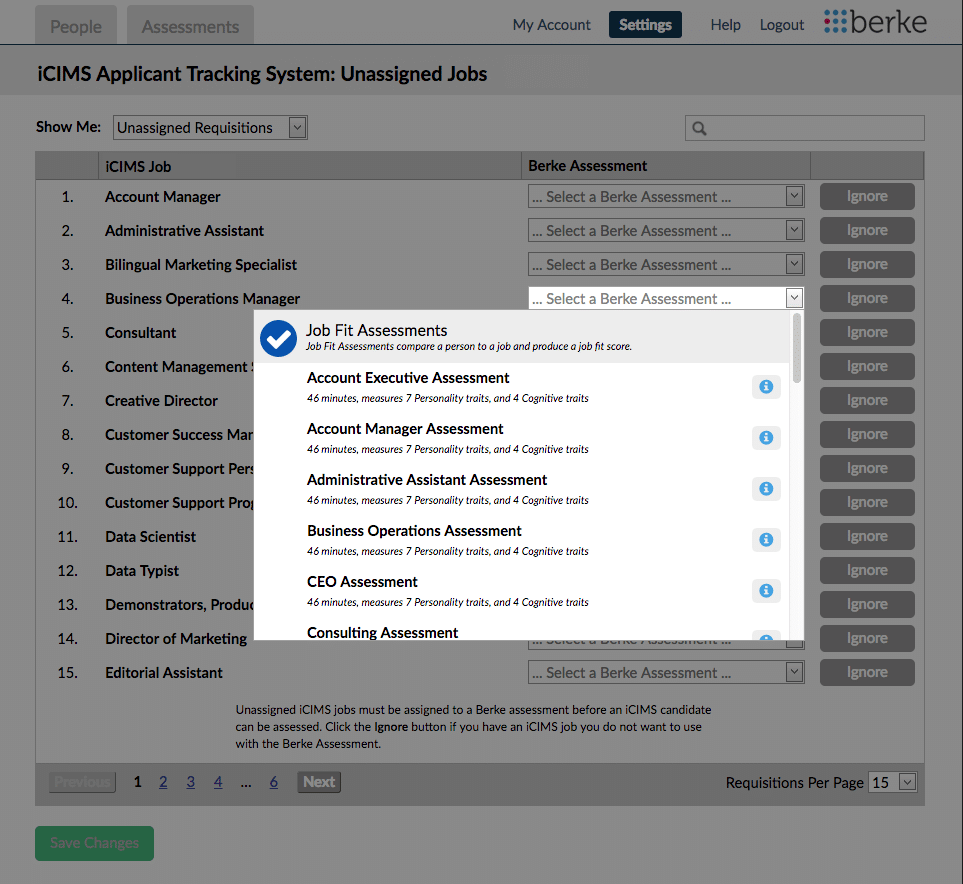
- Go to Settings in the upper right menu. Scroll down to Applicant Tracking and select “Assign Jobs” to reach the configuration page.
- By default, you will be shown a list of any unassigned jobs currently in iCIMS. Click the dropdown to the right of the job’s name to select an assessment to assign to it. You can assign the same assessment to multiple jobs. Click the “Ignore” button if you have a iCIMS job you do not want to use with the Berke Assessment. If you have a lot of unassigned jobs at any given time, you can opt to use the auto-assign rules tool to process these more rapidly in the future.

- Select the “Save Changes” button at the bottom left of the page when you are done.
iCIMS Connector advanced settings
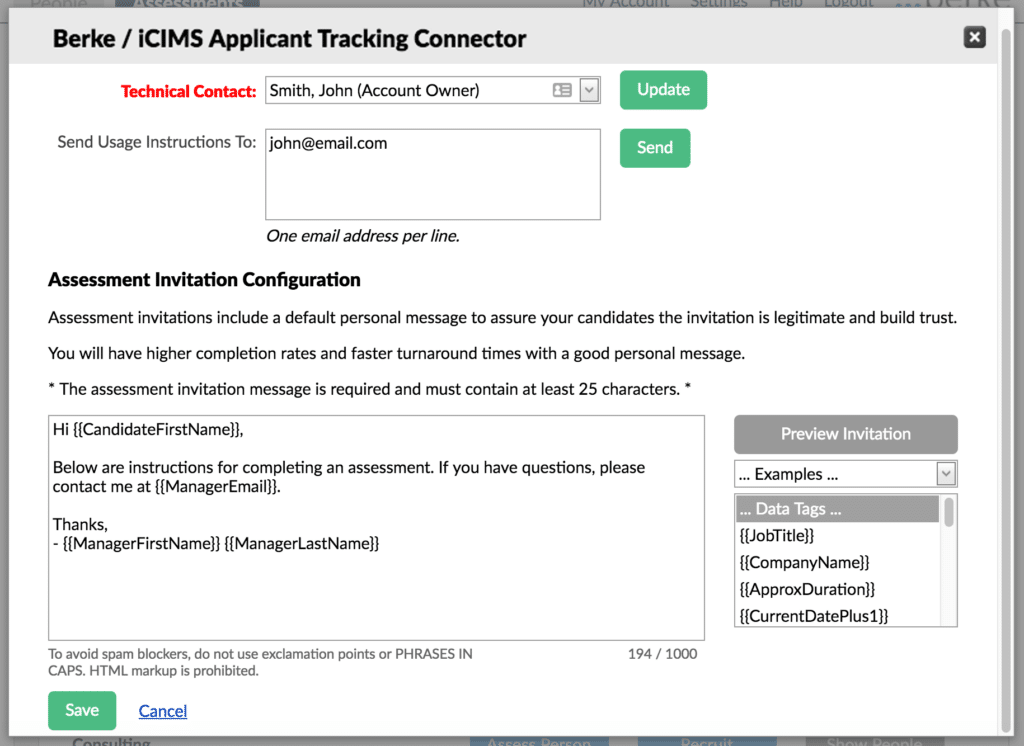
Administrative accounts within Berke have further advanced settings available for use. To view these options, login to your Berke account and go to Settings in the upper right menu. Scroll down to Applicant Tracking and select “iCIMS ATS” to reach the administrative settings page.

Technical Contact
The Technical Contact is the person assigned to receive any error messages the system might issue such as an assessment invitation that cannot be delivered (probably due to an invalid email address) as well as any assignment alerts.
Send Usage Instructions
Use this field to enter email addresses (one per line) for anyone you’d like to send a list of instructions on how to invite candidates to Berke assessments using iCIMS as well as other subjects such as reviewing completed assessment results within iCIMS.
Configure Assessment Invitation Message
Below this is an area where you can compose your message to candidates when inviting them to take an assessment. It is designed as a template so that you can insert dynamic data tags such as the candidate’s name, manager’s name, or job title that will change according to each candidate’s application situation and add a personal touch to your message as well as build trust.

Topics: connect other tools
